Preamble
OpenVPN is an open source project to provide Virtual Private Networking connections between clients and remote networks via the Internet (as an example). There are many use cases for VPN, today though we'll look at using VPN to connect a remote engineers laptop/PC to a site LAN for the specific purpose of remote monitoring and control using Mitsubishi tools such as GX Works and GT Designer, which is a mode I refer to as "device mode".
An example of a VPN in “device mode”…
Devices on both ends of the tunnel will be as
though on the same network.
Note! If OpenVPN is built into your device, as in this case a TP-Link ER605 VPN Router, then it can be used for free, and in conjunction with the remote client also using the free OpenVPN Connect app.
Requirements
There are three aspects to
creating a VPN solution…
- Establish a
VPN Server (whether home with hardware or a cloud service)
- Download and
install a VPN Client for the required operating system/device
- Utilise an
account/certificate to authenticate the client to the server
In this example we shall be using a TP-Link ER605 VPN Router to act as the server on our remote site LAN. It will generate the required OpenVPN Certificate, and we'll use the desktop app, OpenVPN Connect to secure the connection using that certificate before establishing the VPN link.
In the finish, both client PC and remote devices will appear as though on the same network, for example, all will have a subnet of 198.168.x.x. We'll focus on one device for this exercise, the PLC.
We've got a shiny new Mitsubishi FX5U (aka iQ-F), and we will configure it to run its built-in HTTP Web Server on Port 80...
Scope
We'll go "broad strokes" with the setup here, as it is assumed the reader already has some experience/proficiency in Mitsubishi programming tools and basic networking. This guide is by no means exhaustive, there are some steep learning curves with setting up the ER605 VPN Router and the ZTE Modem for the first time. The guide is intended to demonstrate what can be done, if you persevere!
FX5U PLC Setup
Using GX Works3, create a project and browse to the Ethernet Port node in the navigator...
Double-click to open the settings pane, then choose Own Node Settings...
Enter an IP Address (bearing in mind the first 2 values must match the final combined LAN subnet, for example 192.168. in this case). Then set a subnet mask of 255.255.255.0
Next, we need to setup the web server. Click the Web Server Settings node...
Set to "Use" the web server function, Port 80 then click on Account Settings to create a user account with a log in password.
We've setup a username of "guest" and a simple password. For right now they can only access the System Web Page, and they cannot write any binary or numerical values into the PLC.
As an aside, the FX5U does also run a full graphical web site, and these are known as the User Pages, where values can be read and written and all manner of gadgets are available - which is beyond the scope of this guide. Separate guide to follow.
That's the most basic setup for the PLC complete. Download the PLC Parameters as a minimum, and then restart it for the changes to take effect. Note! You do not need any actual logic program for these features to be tested.
✋ Do not connect the PLC to the ER605 just yet, we have a little setup to do on that first!
ER605 VPN Router Setup
Note! The version of ER605 should be at least V2. This has support for a 4G/LTE USB Modem and OpenVPN. Whilst V1.6 has support for other VPN services, it does not support OpenVPN, and only OpenVPN has been tested. Also, V1.6 does not have the USB port.
Follow the setup procedures provided with the ER605 until you have it configured enough so that you have an Internet connection to it from either the 4G/LTE Modem or the WAN port to an upstream ISP router for example.
In this guide we have utilized a ZTE 4G/LTE Wi-fi Dongle - MF79U. It connects to the router as a USB modem, but also provides a Wi-fi hot spot for enhanced functionality...
Local LAN
Firstly, we'll want to configure the Local LAN, this is the LAN downstream of the ER605, of which all of our devices, such as PLC, HMI and Web Cam will be a part of.
In the ER605 control panel web page browse to Network > LAN...
Set the required minimum values...
Note! The DHCP Starting and Ending range has been set between .100 and .199. This is because we are hard-coding the IP Addresses into all our devices, for example the PLC has an IP Address of 192.168.1.210. (We could use MAC Address reservations, but I find this simpler!).
Ensure the PLC Ethernet port is now connected to one of the ER605 LAN ports.
OpenVPN Setup
In order to establish a
connection via OpenVPN we will need:-
- OpenVPN
Server on running on ER605 on port 1194 (the default port)
- Create a client.opvn certificate for use by
clients
- Port forward
1194 through the ZTE modem
To setup the server browse to VPN
> OpenVPN > OpenVPN Server TAB…
Create a new OpenVPN server with such details...
Note! Local Network: 192.168.1.1 / 16. This allows for the remote client LAN and this Local LAN to be joined at the 192.168.x.x level to become as one. (I'm not an expert, but it works!)
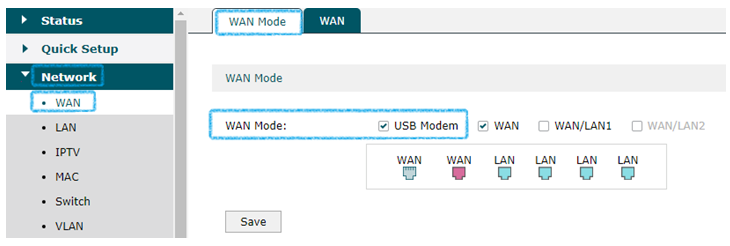
Also note, we selected WAN: as "WAN" and not "USB Modem", again, this does work, see note below.
Network > WAN > WAN Mode
does suggest the USB Modem is being used in WAN Mode…
OpenVPN Certificate (and problem!)
We can now generate an OpenVPN
Certificate for use with clients. Press the Export Cert. icon…
The certificate is normally saved to your Downloads folder.
However, there is a problem – if
we open the file in Notepad, we can see that there is no “remote ipaddress port” entry at all. 😕 And in fact, if you try to use
this file in OpenVPN Connect it will report the same issue and you will not be
able to use this certificate...
To resolve this, ensure you are connected to the ER605 via the ZTE Modem, open a web browser and search "what is my ip address". This will be the IP Address of the ZTE Modem, and by default the External IP Address of the OpenVPN server.
For an example, we can now add the following line into the certificate file...
Which is "remote ", the IP Address and finally the Port of 1194 as previously set. Save the file. We will need it later for the OpenVPN Client Connect app.
Port Forwarding/Mapping
At this point we have a running OpenVPN server on an ER605 VPN Router.
Note! Whilst this guide revolves around the ZTE 4G Modem, if in fact you are using the WAN Ethernet port for Internet via an upstream ISP router, the procedure will be similar. See your ISP Hub/Router documentation for equivalent settings.
We need two more setups. Firstly, we need to know the IP Address of the Router itself, as supplied by the ZTE Modem (or WAN device). We can find this is a couple of ways, either from the ZTE Modem, by looking at its Client list, or by the ER605 control panel to see it's assigned IP Address.
In the ER605 for example, browse to Status > System Status...
The given IP Address being 192.168.0.178. Note! This address is not relevant to our Local LAN settings. This address is for the ZTE LAN use only.
And with that, we can now setup Port Forwarding of the OpenVPN Server port of 1194, at IP Address 192.168.0.178 through the ZTE Modem Firewall to the Internet.
Connect to the ZTE Modem over Wi-fi and log in to its control panel web page...
Scroll down and tap the Advanced Settings gear...
Click on the Firewall TAB...
Then click on Port Mapping, next enable Port Mapping...
Create a new rule for the OpenVPN server on Port 1194, which should appear as below when done...
That's all the hardware and configurations setup! Still here? Ready for the big reveal? 😎
OpenVPN Connect & Certificate
Download and install the free OpenVPN Client Connect app from their website.
Now, this is the most critical point - whatever Internet connection you are using must NOT be that of the ZTE Modem or ER605 Router. So, ensure you are on an entirely different connection. If you have an Ethernet cord from your programming PC to the ER605 - pull that out to be sure also!
Start the OpenVPN Connect app,
tap the (+) New icon, and add the certificate file by drag-drop or browse
methods…
Once loaded, hit the [Connect] button, wait a little while, and if all Okay...
Once connected, open a Command Prompt and try a "Ping" test to verify the connection to the ER605...
If successful, you can now connect to the PLC, or HMI or any other devices on the site LAN via VPN and simply use the original IP Address of each device as normal. We'll try the Mitsubishi FX5U Web Server now...
After log in, the default System Web Page is displayed...
Conclusion
From a standing start, a VPN, router and modem setup is a bit daunting, especially if you're not an IT guru, but with some patience, much Googling and keeping a calm head, we can get the job done!
There are many enhancements to be done here also, for one example, the IP Address of the ZTE Modem (or ISP router) will change periodically, so we can use a Dynamic DNS service to resolve the IP Address into something plain text, for example, myRemoteLan.ddns.net - and this works, it can replace the static IP Address in the client.ovpn certificate file.
A DDNS client is built into both the ER605 and the ZTE Modem - so for our purposes we'd use the ER605 DDNS service in this case, which has been tested successfully with NO-IP. 👍
~~~ End ~~~
Disclaimer
Whilst some effort has been put into this guide, there is no certainty it will work for you in the exact same manner. Its purpose is to offer ideas and steps that have worked in this example that might inspire your own projects.