
The new generation Mitsubishi GS Series HMI's now support the VNC Server function previously only found in the much higher end GT2000 Series. Specifically, you'll need the GS21**-W-N (N for New!) version.
We'll look at configuring the HMI with GT Designer 3, the VNC License Key and using the free UltraVNC client viewer...
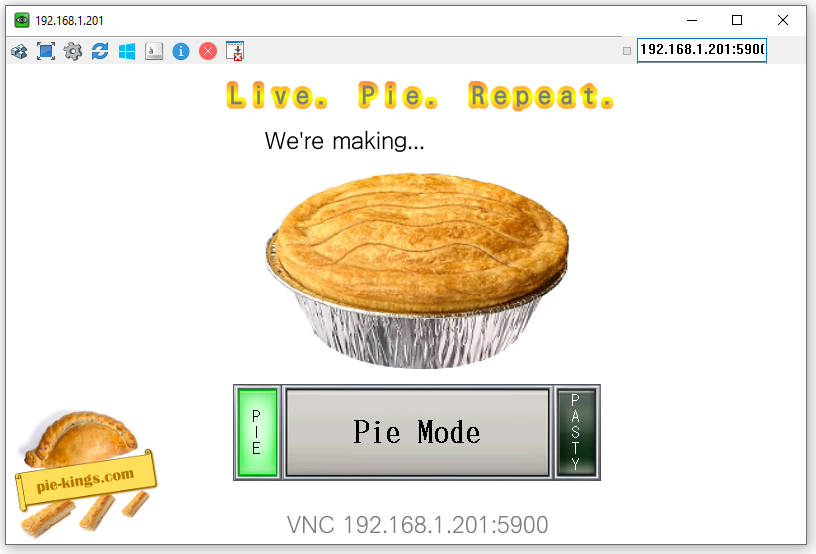 |
| UltraVNC in remote control of a GS2107 |
Scope
In this post we're going "broad strokes", so not too much nitty gritty on how to configure your HMI screens, as in our example we have a button that alternates a M store in the PLC, and this store is used in turn to alternate an image between "Pie" and "Pasty" and illuminating the associated "mode" lamps as shown above.
We will though look in detail at the VNC server settings and installing the VNC License Key, talking of which, here's the part number and details:-
GT25-VNCSKEY-1
VNC licence key for GT2107-WTSD & GT25/27 series HMIs - 1 licence*
£27.50 (as at 2022)
*doesn't say so, but works with aforementioned GS!
Note! You may still get the GS2107 with a FX5U and IQ Works complete as part of the OEM Starter Kit - for £600 + VAT. Check with your Mitsubishi distributer. In the UK try LC Automation or BPX.
Once we're all done we'll discover a surprise trick that the VNC feature doesn't advertise! 😉
GT Designer 3 Project
Spin up your GT Designer 3 (version used 1.280S) and create a new project. Critically - there are TWO versions of GS Series HMI's - however, we can only use the -N version for VNC ...
 |
| GS21**-W-N (just -W is a no go!) |
Complete the setup in the normal fashion as you would.
Configure the screens as you require.
To add the VNC functionality we have a few settings to configure in the project. Expand the System TAB in the project explorer...

1) Give the HMI an IP Address
Double-click the Advanced Setting/GOT IP Address Setting node and set the IP Address and Subnet mask as required (example below)...

Press [OK] to apply and update at the bottom of the dialogue.
2) Enable the VNC Server function
Double-click the VNC Server node and check the [ ] Update the VNC server function setting...

Note! If you click the above 2) VNC Server button it will jump you to the next stage, so just Press [OK] to apply and update at the bottom of the dialogue, and proceed with this guide!
3) Configure the VNC Server access
Double-click the Peripheral Unit Setting/GOT IP Address Setting node...

Check the [ ] Use VNC Server check box.
Leave the default port of 5900 (which is the convention for VNC apps).
Optionally, enter a password to permit connection from the remote VNC client app. If a password is set then you will be required to enter it when UltraVNC starts the connection.
Without getting into the exclusive access controls and authorisation mechanisms, for right now, just ensure that [ ] Restrict simultaneous operations of PC and GOT is UN-CHECKED!
Press [OK] to apply and update at the bottom of the dialogue.
You're all set. Download the HMI project into your target HMI.
VNC License Key Installation
When you receive your license certificate key it will in fact be a printed certificate with the key in the numerical format of 123-12345-1234. You cannot enter this into GT Designer 3, you must physically attend the target HMI, enter into the BIOS and punch the number in.
Unless you changed the default settings under System TAB > GOT Setup > Operation Setting / Utility Call Key...

Then press and hold the top right hand corner on the HMI screen with a suitable digit for over 2 seconds. The BIOS main menu should pop up. Tap the [GOT Setup] button...

Then tap the [License Manager] button...

Enter the license key code, then press [Register] (button text will change to Registered)...

To finish tap the [ X ] on the top right hand corner all the way back until you exit the BIOS and return to the HMI screens.
Note! To move a license to another HMI, press [Cancel Reg.] then take the license to the other device and register it.
And the surprise VNC Trick?
All the above 3 screen grabs were taken via the VNC client app - after the license had been installed. In other words, all the functionality of the HMI BIOS, including Ladder Editor, Device Monitor, etc can all be had via the VNC connection! 😎
Moving on...
VNC Client App
Mitsubishi have published a Technical Bulletin that lists various VNC client apps and thier status. Search for GOT-A-0069-E. Here is a summary from that document...

Today we're going to use UltraVNC. (Note! Not mentioned in the list is Tiger VNC - which also worked to a lesser extent).
Download and install the relevant version for your O/S. Start the app...

Enter the HMI IP Address and Port number you configured then tap [Connect].
Anecdote
We recently had a customer with a GT2710 HMI installed and running the MES (SQL Server Database) Interface. For some bizarre reason it had lost its IP Address after a series of apparently coincident events (mmm, not convinced)! So we went in found the HMI IP had reverted to 0.0.0.0 and so restored it to its proper value.
As leaving site we suggested to the customer we could install the VNC Server on the HMI, so he could at least dial in and ensure the IP Address was still Okay... yah, didn't think that one through! 😏😂
Oh yes, Pasty Mode...
 |
| Made with love by www.pie-kings.com |
~~~ End ~~~
Disclaimer
Whilst some effort has been put into this guide, there is no certainty it will work for you in the exact same manner. Its purpose is to offer ideas and steps that have worked in this example that might inspire your own projects.